UnityのUI ToolkitでUXMLファイルをテンプレートとして使い回す方法についてまとめました。
- はじめに
- スクリプトからUXMLをインスタンス化して追加する
- UXMLからテンプレート用のUXMLを使う
- テンプレートのアトリビュートをオーバーライドする
- テンプレートのスタイルをオーバーライドする
- テンプレートの特定のVisualElementの子に要素を追加する
- 関連
- 参考
Unity 2022.2.17
はじめに
ネストが深く複雑なUIや、リスト表示の要素のように使い回しをするようなUIを作る場合、一つのUXMLファイルに全ての記述をすると開発効率や保守性が悪くなります。
このようなケースに対応するため、UI ToolkitにはUXMLファイルをテンプレートとして使い回す機能が用意されています。
本記事ではこの仕組みについてまとめます。
まず準備として、テンプレートとして使い回すためのUXMLファイルを作成しておきます。
UI Builderを使って下図のように二つのボタンを持つレイアウトを作成しました。

生成されたUXMLファイルの中身は以下の通りです。
<ui:UXML xmlns:ui="UnityEngine.UIElements" xmlns:uie="UnityEditor.UIElements" xsi="http://www.w3.org/2001/XMLSchema-instance" engine="UnityEngine.UIElements" editor="UnityEditor.UIElements" noNamespaceSchemaLocation="../../UIElementsSchema/UIElements.xsd" editor-extension-mode="True">
    <ui:VisualElement style="flex-grow: 0; flex-direction: row; align-items: flex-start; margin-left: 8px; margin-right: 8px; margin-top: 4px; margin-bottom: 4px;">
        <ui:Button text="Left Button" display-tooltip-when-elided="true" name="LeftButton" style="flex-grow: 1; flex-basis: 0;" />
        <ui:Button text="Right Button" display-tooltip-when-elided="true" name="RightButton" style="flex-basis: 0; flex-grow: 1;" />
    </ui:VisualElement>
</ui:UXML>
これを今回はAssets/Example/example_template.uxmlとして保存しました。
スクリプトからUXMLをインスタンス化して追加する
それではまず、スクリプトからこのテンプレートをインスタンス化して、親となるVisualElementの子として追加してみます。
これを行うには、以下のようにVisualTreeAsset.Instantiate()を使います。
using UnityEditor;
using UnityEngine;
using UnityEngine.UIElements;

public sealed class Example : EditorWindow
{
    [SerializeField] private VisualTreeAsset template;

    private void CreateGUI()
    {
        var instance1 = template.Instantiate();
        rootVisualElement.Add(instance1);

        var instance2 = template. Instantiate();
        rootVisualElement.Add(instance2);
    }

    [MenuItem("Window/Example")]
    public static void ShowWindow()
    {
        GetWindow<Example>();
    }
}
このスクリプトではテンプレートから二つのインスタンスを作ってEditorWindowのルートに追加しています。
Inspectorからtemplateフィールドにexample_template.uxmlをアサインして、Window > Exampleからウィンドウを開くと下図のようにテンプレートを使いまわせていることを確認できます。

UXMLからテンプレート用のUXMLを使う
以下のようにTemplateやInstanceといったUXMLの要素を使うと、UXMLからテンプレート用のUXMLファイルを使うことができます。
<ui:UXML xmlns:ui="UnityEngine.UIElements" xmlns:uie="UnityEditor.UIElements" xsi="http://www.w3.org/2001/XMLSchema-instance" engine="UnityEngine.UIElements" editor="UnityEditor.UIElements" noNamespaceSchemaLocation="../../UIElementsSchema/UIElements.xsd" editor-extension-mode="False">
    <ui:Template src="/Assets/Example/example_template.uxml" name="Example"/>
    <ui:VisualElement>
        <ui:Instance template="Example"/>
        <ui:Instance template="Example"/>
    </ui:VisualElement>
</ui:UXML>
これをexample.uxmlとして保存しておきます。
動作確認のためEditorWindowは以下のように書き換えます。
using UnityEditor;
using UnityEngine;
using UnityEngine.UIElements;

public sealed class Example : EditorWindow
{
    [SerializeField] private VisualTreeAsset example;

    private void CreateGUI()
    {
        example.CloneTree(rootVisualElement);
    }

    [MenuItem("Window/Example")]
    public static void ShowWindow()
    {
        GetWindow<Example>();
    }
}
Inspectorからexampleフィールドにexample.uxmlをアサインして、Window > Exampleからウィンドウを開くと下図のようにテンプレートを使いまわせていることを確認できます。
テンプレートのアトリビュートをオーバーライドする
次に、テンプレートのインスタンスでボタンの文字列をテンプレートのものから書き換えることを考えます。
これはAttributeOverrides要素を使うことで実現できます。
以下はボタンのインスタンスを生成しつつ、ボタンの文字列とTooltipをオーバーライドしている例です。
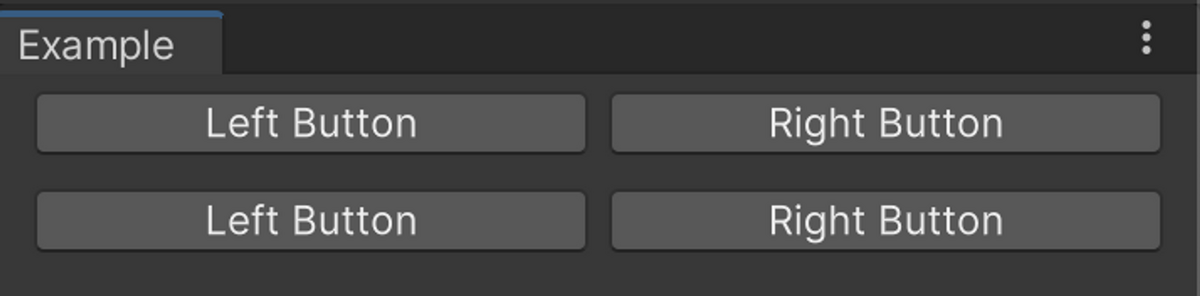
<ui:UXML xmlns:ui="UnityEngine.UIElements" xmlns:uie="UnityEditor.UIElements" xsi="http://www.w3.org/2001/XMLSchema-instance" engine="UnityEngine.UIElements" editor="UnityEditor.UIElements" noNamespaceSchemaLocation="../../UIElementsSchema/UIElements.xsd" editor-extension-mode="False">
    <ui:Template src="/Assets/Example/example_template.uxml" name="Example"/>
    <ui:VisualElement>
        <ui:Instance template="Example">
            <AttributeOverrides element-name="LeftButton" text="[Override] Left Button" tooltip="This is the left button." />
            <AttributeOverrides element-name="RightButton" text="[Override] Right Button" tooltip="This is the right button." />
        </ui:Instance>
    </ui:VisualElement>
</ui:UXML>
これをEditorWindow上に表示すると、下図のようにボタンの文字列が変わっていることを確認できます。

また、ボタンの上にマウスカーソルを乗せるとTooltipが表示されることを確認できます。
テンプレートのスタイルをオーバーライドする
さて、前節の方法でほとんどのアトリビュートはオーバーライドできるのですが、styleアトリビュートだけはオーバーライドできません。
styleをオーバーライドするには、スタイルシートを適用する必要があります。
これを行うために、まず、example.uxmlを以下のように書き換えます。
インスタンスにExampleInstanceという名前をつけ、さらにexample.ussという名前のスタイルシートを適用しています。
<ui:UXML xmlns:ui="UnityEngine.UIElements" xmlns:uie="UnityEditor.UIElements" xsi="http://www.w3.org/2001/XMLSchema-instance" engine="UnityEngine.UIElements" editor="UnityEditor.UIElements" noNamespaceSchemaLocation="../../UIElementsSchema/UIElements.xsd" editor-extension-mode="False">
    <ui:Template src="/Assets/Example/example_template.uxml" name="Example"/>
    <Style src="example.uss"/>
    <ui:VisualElement>
        <ui:Instance template="Example" name="ExampleInstance"/>
    </ui:VisualElement>
</ui:UXML>
そして同階層に以下の内容でexample.ussを作成します。
#ExampleInstance #LeftButton {
    background-color: blue;
}
#ExampleInstance #RightButton {
    background-color: green;
}
ExampleInstance配下のLeftButtonの背景色を青色に、RightButtonの背景色を緑色に変更しています。
このあたりのUSSの知識は本筋と逸れるので本記事では割愛しますが、以下の記事にまとめていますので必要に応じて参照してください。
この状態でWindow > Exampleからウィンドウを開くと以下のようにボタンの背景色が変わっていることを確認できます。

テンプレートの特定のVisualElementの子に要素を追加する
さて最後に、テンプレートの中にある特定のVisualElementの子要素に対して、インスタンス側で要素を追加する方法を紹介します。
まず、以下のようなテンプレートを作ります。
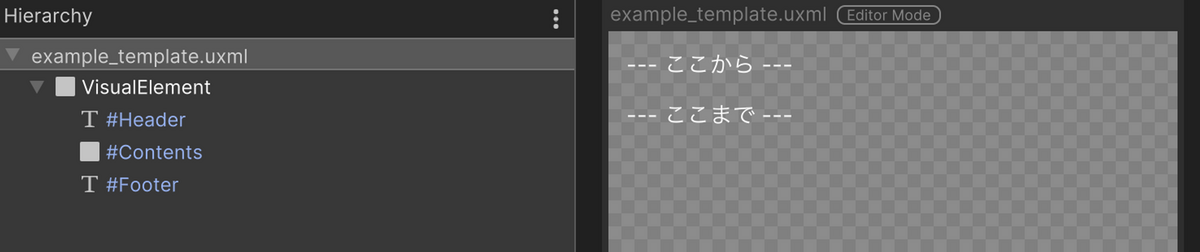
「--- ここから ---」と「--- ここまで ---」のテキストの間に空のVisualElementをContentsという名前で配置しています。
UXMLは以下の通りです。
<ui:UXML xmlns:ui="UnityEngine.UIElements" xmlns:uie="UnityEditor.UIElements" xsi="http://www.w3.org/2001/XMLSchema-instance" engine="UnityEngine.UIElements" editor="UnityEditor.UIElements" noNamespaceSchemaLocation="../../UIElementsSchema/UIElements.xsd" editor-extension-mode="True">
    <ui:VisualElement style="flex-grow: 0; flex-direction: column; align-items: flex-start; margin-left: 8px; margin-right: 8px; margin-top: 4px; margin-bottom: 4px;">
        <ui:Label tabindex="-1" text="--- ここから ---" display-tooltip-when-elided="true" name="Header" style="color: rgb(255, 255, 255);" />
        <ui:VisualElement name="Contents" />
        <ui:Label tabindex="-1" text="--- ここまで ---" display-tooltip-when-elided="true" name="Footer" style="color: rgb(255, 255, 255);" />
    </ui:VisualElement>
</ui:UXML>
つぎに、このUXMLファイルを直接編集し、Contentsを以下のように書き換えます。
<ui:UXML xmlns:ui="UnityEngine.UIElements" xmlns:uie="UnityEditor.UIElements" xsi="http://www.w3.org/2001/XMLSchema-instance" engine="UnityEngine.UIElements" editor="UnityEditor.UIElements" noNamespaceSchemaLocation="../../UIElementsSchema/UIElements.xsd" editor-extension-mode="True">
    <ui:VisualElement style="flex-grow: 0; flex-direction: column; align-items: flex-start; margin-left: 8px; margin-right: 8px; margin-top: 4px; margin-bottom: 4px;">
        <ui:Label tabindex="-1" text="--- ここから ---" display-tooltip-when-elided="true" name="Header" style="color: rgb(255, 255, 255);" />
        <ui:VisualElement name="Contents" content-container="_" >
            <!-- ここにコンテンツが追加されます -->
        </ui:VisualElement>
        <ui:Label tabindex="-1" text="--- ここまで ---" display-tooltip-when-elided="true" name="Footer" style="color: rgb(255, 255, 255);" />
    </ui:VisualElement>
</ui:UXML>
このようにcontents_container属性をつけることで、Contentsの配下に要素が追加されるようになります。
contents_containerの値は任意の文字列で良いようです。
このテンプレートを、example.uxmlから以下のように参照します。
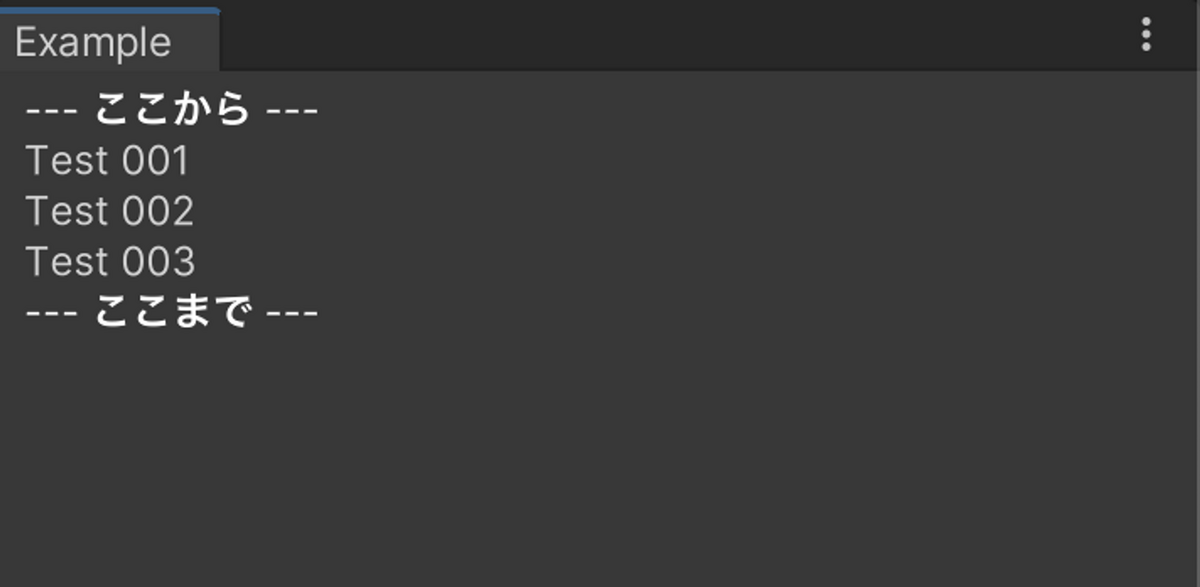
<ui:UXML xmlns:ui="UnityEngine.UIElements" xmlns:uie="UnityEditor.UIElements" xsi="http://www.w3.org/2001/XMLSchema-instance" engine="UnityEngine.UIElements" editor="UnityEditor.UIElements" noNamespaceSchemaLocation="../../UIElementsSchema/UIElements.xsd" editor-extension-mode="False">
    <ui:Template src="/Assets/Example/example_template.uxml" name="Example"/>
    <ui:Instance template="Example">
        <ui:Label text="Test 001"/>
        <ui:Label text="Test 002"/>
        <ui:Label text="Test 003"/>
    </ui:Instance>
</ui:UXML>
これをEditorWindowに表示すると、下図のようにContents内にテキストが追加されていることを確認できます。