Google Workspace アドオンの基本的な作り方をまとめました。
Google Workspaceアドオンとは?
Google Workspaceアドオンは、Google Spreadsheet、Google Drive、Google DocumentなどGoogle Workspaceアプリの拡張機能を作るための仕組みです。
アドオンは右側にあるサイドパネルに追加されるため、各アプリケーションと同じ画面上で実行することができます。
本記事ではこの機能の基本的な使い方についてまとめます。
セットアップ〜簡単なアドオンの作成までの手順
それではまずアドオンをセットアップして簡単に動作させてみます。
まず以下のページから「新しいプロジェクト」を作ります。
プロジェクトをダブルクリックするとスクリプトエディタが開かれることを確認できます。
エディタを開いたらまず、左のサイドメニュー > プロジェクトの設定 > 「appsscript.json」マニフェスト ファイルをエディタで表示する にチェックを入れます。
左のサイドメニューから「エディタ」に戻ると、appscript.jsonが表示されていることを確認できます。

このappscript.jsonにアドオンの設定を記載していきます。
現時点ではひとまず以下のように書いておきます。
{
  "timeZone": "Asia/Tokyo",
  "exceptionLogging": "STACKDRIVER",
  "runtimeVersion": "V8",
  "addOns": {
    "common": {
      "homepageTrigger": {
        "runFunction": "onHomePageOpen",
        "enabled": true
      },
      "layoutProperties": {
        "primaryColor": "#673ab7",
        "secondaryColor": "#9c27b0"
      },
      "logoUrl": "https://dummyimage.com/100x100/000000/fff&text=DUMMY",
      "name": "Example"
    },
    "drive": {
    }
  },
  "oauthScopes": [
    "https://www.googleapis.com/auth/drive"
  ]
}
次にスクリプトを書きます。
簡単なUIを表示するだけのシンプルなスクリプトです。
function onHomePageOpen(event) {
  var card = CardService.newCardBuilder();
  card.setHeader(CardService.newCardHeader().setTitle('Example'));

  var section = CardService.newCardSection();
  section.addWidget(CardService.newTextInput()
    .setFieldName('Example Field1')
    .setTitle('Example Field1'));
  section.addWidget(CardService.newTextInput()
    .setFieldName('Example Field2')
    .setTitle('Example Field2'));

  card.addSection(section);

  return [card.build()];
}
スクリプトが書けたら、次にGCPのプロジェクト番号を取得します。
GCPのコンソールにアクセスして、以下の手順でプロジェクトの設定を表示し、プロジェクト番号をコピーしてください(まだプロジェクトを作ってない場合は作ってください)。

プロジェクト番号をコピーしたら、Apps Scriptのプロジェクトに戻り、左側のサイドメニューからプロジェクト設定 > Google Cloud Platform (GCP) プロジェクト > プロジェクトを変更ボタンをクリックします。
「GCPのプロジェクト番号」というインプットフィールドが表示されるので、ここに先ほどの番号を入力します。

ここまできたらあとは動作確認です。
上部の「デプロイ」メニューから「デプロイをテスト」を選択します。
以下のようなデプロイをテストウィンドウが開かれるので完了をクリックします。

Google Driveを開くと右側にメニューが出てくることを確認できます。
初回は認証が行われ、その後に以下の画面が出たら完了です。

マニフェストファイルを理解する
次に、上記でも作成したマニフェストファイルの記述のうち、覚えておくべきものをまとめます。
addOns
addOnsオブジェクトには、アドオンにより拡張するアプリケーションごとの設定を記述します。
上例ではGoogle Driveを拡張するアプリを作詞しているため、commonとdriveオブジェクトを定義しています。
commonは全アプリに共通する設定で必須項目です。
記述内容の詳細や、Google Drive以外のアプリを拡張したい場合の記述については以下のドキュメントを参照してください。
oauthScope
oauthScopes配列には、このアドオンで必要とする権限の記述を行います。
もし足りていないスコープがあったら実行時にエラーが出るので、以下に記述されているスコープのうち適切なものを足します。
トリガー
上述のマニフェストではhomepageTriggerを設定しています。
これはこのアドオンが表示された時に呼ばれるトリガーで、指定した名前のメソッド(上述の例ではonHomePageOpen)が実行されます。
トリガーは他にもいくつかあります。
Google Driveのアイテムが選択された時のonItemsSelectedTriggerはその一例です。
UI(カード)を理解する
アドオンのGUIは「カード」と「セクション」、「ウィジェット」から構成されます。
カードはいわゆるページのようなもので、アドオンのGUIでは常にいずれかのカードが一つ表示されている状態になります。
カードにはいくつかのセクションを入れることができ、各セクションにはラベルやボタンなどのUI要素である「ウィジェット」を入れることができます。
https://developers.google.com/apps-script/add-ons/concepts/cards?hl=ja より カード

ウィジェットのリファレンスはこの辺りにあるので、いろんなウィジェットを試してみたい場合はこちらを参照するとよさそうです。
Card Service | Apps Script | Google for Developers
もう少し実践的なアドオンを作成する
次に、もう少し実践的なアドオンを作成してみます。
今回は入力したファイルIDのファイルを選択したフォルダにコピーするアドオンを作ります。
マニフェスト
マニフェストは以下のように記述します。
上述の例からそんなに変えていないです。onItemsSelectedTriggerとスコープを追加しました。
{
  "timeZone": "Asia/Tokyo",
  "exceptionLogging": "STACKDRIVER",
  "runtimeVersion": "V8",
  "addOns": {
    "common": {
      "homepageTrigger": {
        "runFunction": "onHomePageOpen",
        "enabled": true
      },
      "layoutProperties": {
        "primaryColor": "#673ab7",
        "secondaryColor": "#9c27b0"
      },
      "logoUrl": "https://dummyimage.com/100x100/000000/fff&text=DUMMY",
      "name": "File Copy Tool"
    },
    "drive": {
      "onItemsSelectedTrigger": {
        "runFunction": "onItemSelected"
      }
    }
  },
  "oauthScopes": [
    "https://www.googleapis.com/auth/drive",
    "https://www.googleapis.com/auth/drive.addons.metadata.readonly"
  ]
}
スクリプト
スクリプトは以下のように記述します。
const seletedFolderIdKey = 'selected-folder-id';
const inputFileIdKey = 'input-file-id';
const folderIconFileId = '1-ZXnzwBeHr-UVFjcXpo5emYk-0co4VKr'; // フォルダアイコンの画像のGoogleドライブにおけるファイルID
const fileIconFileId = '17HX-KhKiCVWrL9ABMMvDjTV7CxLCIY9x'; // ファイルアイコンの画像のGoogleドライブにおけるファイルID

// 最初に開かれた時の処理 (appscript.jsonにメソッド名を設定)
function onHomePageOpen(event) {
  // 永続データをリセット
  var userProperties = PropertiesService.getUserProperties();
  userProperties.setProperty(seletedFolderIdKey, '');
  userProperties.setProperty(inputFileIdKey, '');

  // カードを作成
  var card = CardService.newCardBuilder();
  card.setHeader(CardService.newCardHeader().setTitle('Select Destination Folder'));
  var section = CardService.newCardSection();
  // - 画像はURLからも取得できるし、以下のようにドライブのファイルIDを指定することも可能
  var imageBytes = DriveApp.getFileById(folderIconFileId).getBlob().getBytes();
  var encodedImageURL = "data:image/jpeg;base64," + Utilities.base64Encode(imageBytes);
  section.addWidget(CardService.newImage().setImageUrl(encodedImageURL));
  // - テキスト
  section.addWidget(CardService.newTextParagraph()
    .setText('<i><font color=\"#999999\">To start, Please select the destination folder where you want to copy the file.</font></i>'));
  section.addWidget(CardService.newTextParagraph()
    .setText('<i><font color=\"#999999\">Once you have selected the folder, the screen will switch to the selection screen for the files you want to copy.</font></i>'));
  card.addSection(section);

  return card.build();
}

// ファイルやフォルダが選択された時の処理 (appscript.jsonにメソッド名を設定)
function onItemSelected(event) {
  var item = event.drive.activeCursorItem;
  var userProperties = PropertiesService.getUserProperties();
  if (item.mimeType == MimeType.FOLDER){
    // フォルダだったらその情報をUserPropertyに保存してファイル選択画面に遷移
    userProperties.setProperty(seletedFolderIdKey, item.id);
    return createFileSelectionCard();
  }
  else{
    // フォルダ以外だったらUserPropertyをリセットしてエラー画面に遷移
    // 本来であれば Notification 表示くらいでもいいが、onItemsSelectedTrigger の runFunction は何かしらのカード(群)を返さないといけなそうなのでエラー用のカードを返す
    userProperties.setProperty(seletedFolderIdKey, '');
    return createFolderSelectionErrorCard();
  }
}

// ファイルID入力カード
function createFileSelectionCard()
{
  var card = CardService.newCardBuilder();
  card.setHeader(CardService.newCardHeader()
    .setTitle('Input Target File ID'));

  var section = CardService.newCardSection();
  var imageBytes = DriveApp.getFileById(fileIconFileId).getBlob().getBytes();
  var encodedImageURL = "data:image/jpeg;base64," + Utilities.base64Encode(imageBytes);
  section.addWidget(CardService.newImage().setImageUrl(encodedImageURL));

  // ファイルIDインプットフォーム
  section.addWidget(CardService.newTextInput().setFieldName('fileId').setTitle('File ID'));

  section.addWidget(CardService.newTextParagraph()
    .setText('<i><font color=\"#999999\">Please input the ID of the file you wish to copy.</font></i>'));
  section.addWidget(CardService.newTextParagraph()
    .setText('<i><font color=\"#999999\">Once you are done, please execute the copy operation using the Copy button in the footer.</font></i>'));

  card.addSection(section);

  // フッターに「Copy」ボタンを追加
  var copyAction = CardService.newAction().setFunctionName('onCopyButtonClicked');
  var copyButton = CardService.newTextButton().setText('Copy').setOnClickAction(copyAction).setTextButtonStyle(CardService.TextButtonStyle.FILLED);
  card.setFixedFooter(CardService.newFixedFooter().setPrimaryButton(copyButton));

  return card.build();
}

// フッターのCopyボタンが押された時の処理
function onCopyButtonClicked(event)
{
  // ファイルとフォルダを取得してコピー
  var fileId = event.formInput['fileId'];
  var file = DriveApp.getFileById(fileId);
  var userProperties = PropertiesService.getUserProperties();
  var folderId = userProperties.getProperty(seletedFolderIdKey);
  var folder = DriveApp.getFolderById(folderId);
  file.makeCopy(file.getName(), folder);

  // コピーの完了を知らせるNotification(下部に表示されるUI)を作成
  return CardService.newActionResponseBuilder()
      .setNotification(CardService.newNotification().setText("Copied!"))
      .build();
}

// フォルダ選択エラーカード(フォルダではなくファイルを選択した時に表示される)
function createFolderSelectionErrorCard()
{
  var card = CardService.newCardBuilder();
  var section = CardService.newCardSection();
  section.addWidget(CardService.newTextParagraph()
    .setText("<i><font color=\"#999999\">The file has been selected.</font></i>"));
  section.addWidget(CardService.newTextParagraph()
    .setText("<i><font color=\"#999999\">To copy, please select the destination folder rather than the file.</font></i>"));
  card.addSection(section);
  return card.build();
}
コメントを細かく書いているので、説明は割愛します。
動作確認
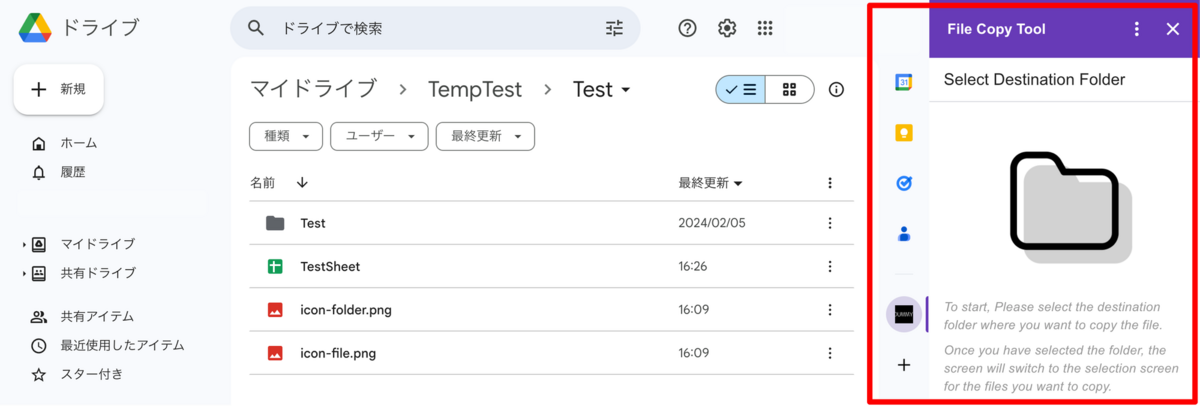
このアドオンを実行すると以下の画面(HomePage)が表示されます。

ここで、GoogleDriveのフォルダを選択すると以下の画面に切り替わります。

ファイルIDを入力して最下部にあるCopyボタンを押下すると、選択したフォルダにファイルがコピーされます。
ちなみにフォルダを先に選択させているのは、トリガーの実行関数は(おそらく)必ずカードを返さないといけないという仕様があるためです。
ファイルID入力カードを先に表示してしまうと、その状態でフォルダが選択された時に、まだファイルIDを入力していないにもかかわらずフォルダ選択カードが表示されてしまいます。
なお使用した画像は以下のとおりです。


スクリプト内で使用しているPropertyServiceとNotificationという機能については、それぞれ以下のドキュメントを参照してください。
参考
アドオンのドキュメントはこのあたり
アドオンのドキュメント - APIリファレンスはこのあたり
アドオンのドキュメント - サンプルはこの辺り