UnityのUI ToolkitでTwoPaneSplitViewを使ってリサイズ可能な二つのペインを持つViewを作る方法についてまとめました。
Unity 2022.2.17
TwoPaneSplitViewとは?
TwoPaneSplitViewを使うと、下図のように大きさが変えられる二つのペインをを持つビューを実装できます。
細かい仕様は以下の通りです。
- 縦方向と横方向のレイアウトに対応
- 親のサイズが変わった時には、どちらか一方のペインサイズを固定して、他方をリサイズする
- 固定するペインをFixedPaneと呼ぶ
- 初期サイズについては、FixedPaneの初期サイズを設定する
- 各ペインについて、折りたたむことができる
本記事ではこれの使い方についてまとめます。
基本的な使い方
基本的な使い方としては、以下のようにTwoPaneSplitViewの子としてそれぞれのペインのVisualElementを追加するだけです。
using UnityEditor;
using UnityEngine.UIElements;

public sealed class Example : EditorWindow
{
    private void CreateGUI()
    {
        // 親のサイズが変わった時にサイズが変わらないペイン(FixedPane)のインデックス(0: 左 / 1: 右)
        var fixedPaneIndex = 1;
        // FixedPaneの初期サイズ
        var fixedPaneInitialWidth = 200f;
        // 子要素が並ぶ方向(Horizontal: 横 / Vertical: 縦)
        var orientation = TwoPaneSplitViewOrientation.Horizontal;
        var splitView = new TwoPaneSplitView(fixedPaneIndex, fixedPaneInitialWidth, orientation);
        rootVisualElement.Add(splitView);

        // 左ペインを追加
        var leftPane = new VisualElement();
        splitView.Add(leftPane);
        leftPane.Add(new Label("Left Pane"));
        leftPane.Add(new Label($"  Index: {splitView.IndexOf(leftPane)}"));

        // 右ペインを追加
        var rightPane = new VisualElement();
        splitView.Add(rightPane);
        rightPane.Add(new Label("Right Pane"));
        rightPane.Add(new Label($"  Index: {splitView.IndexOf(rightPane)}"));
        rightPane.Add(new Label($"  Initial Width: {splitView.fixedPaneInitialDimension}"));
    }

    [MenuItem("Window/Example")]
    private static void Open()
    {
        GetWindow<Example>();
    }
}
注意点として、TwoPaneSplitViewの子にはちょうど二つだけ要素を追加する必要あります。
多くても少なくてもエラーになります。
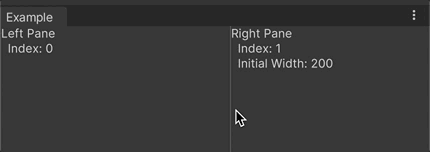
実行結果
Window > Exampleからウィンドウを開くと以下の結果が得られます。

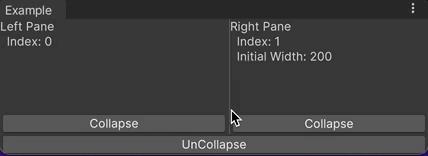
折りたたみ状態の制御
折りたたみ状態を制御するには、TwoPaneSplitView.CollapseChildやTwoPaneSplitView.UnCollapseを使用します。
using UnityEditor;
using UnityEngine;
using UnityEngine.UIElements;

public sealed class Example : EditorWindow
{
    private void CreateGUI()
    {
        var fixedPaneIndex = 1;
        var fixedPaneInitialWidth = 200f;
        var orientation = TwoPaneSplitViewOrientation.Horizontal;
        var splitView = new TwoPaneSplitView(fixedPaneIndex, fixedPaneInitialWidth, orientation);
        rootVisualElement.Add(splitView);

        var leftPane = new VisualElement();
        splitView.Add(leftPane);
        leftPane.Add(new Label("Left Pane"));
        leftPane.Add(new Label($"  Index: {splitView.IndexOf(leftPane)}"));
        // 折りたたみボタンを追加
        leftPane.Add(new VisualElement { style = { flexGrow = 1.0f } }); // Spacer
        leftPane.Add(new Button(() => splitView.CollapseChild(0)) { text = "Collapse" });

        var rightPane = new VisualElement();
        splitView.Add(rightPane);
        rightPane.Add(new Label("Right Pane"));
        rightPane.Add(new Label($"  Index: {splitView.IndexOf(rightPane)}"));
        rightPane.Add(new Label($"  Initial Width: {splitView.fixedPaneInitialDimension}"));
        // 折りたたみボタンを追加
        rightPane.Add(new VisualElement { style = { flexGrow = 1.0f } }); // Spacer
        rightPane.Add(new Button(() => splitView.CollapseChild(1)) { text = "Collapse" });

        // 折りたたみ解除ボタンを追加
        rootVisualElement.Add(new Button(() => splitView.UnCollapse()) { text = "UnCollapse" });
    }

    [MenuItem("Window/Example")]
    private static void Open()
    {
        GetWindow<Example>();
    }
}
実行結果(折りたたみ)
Window > Exampleからウィンドウを開くと以下の結果が得られます。