UnityのUI ToolkitでListViewとListをバインドする方法についてまとめました。
Unity2021.3.16f1
やりたいこと
UI ToolkitにはListViewというUI要素があります。
これを使うと、以下のスクリプトのようなList型の変数(のSerializedProperty)とListViewの配下のUI要素とをバインドすることができます。
using System;
using System.Collections.Generic;
using UnityEngine;

[CreateAssetMenu]
public sealed class Example : ScriptableObject
{
    public List<Item> items = new();

    public void Reset()
    {
        items = new List<Item>
        {
            new() { enabled = true, name = "Item1" },
            new() { enabled = false, name = "Item2" },
            new() { enabled = true, name = "Item3" }
        };
    }

    [Serializable]
    public struct Item
    {
        public bool enabled;
        public string name;
    }
}
本記事ではListViewを使って上記のスクリプトのInspectorを自作する方法をまとめます。
ListViewを作る
まずはListViewを持つUXMLファイルを作ります。
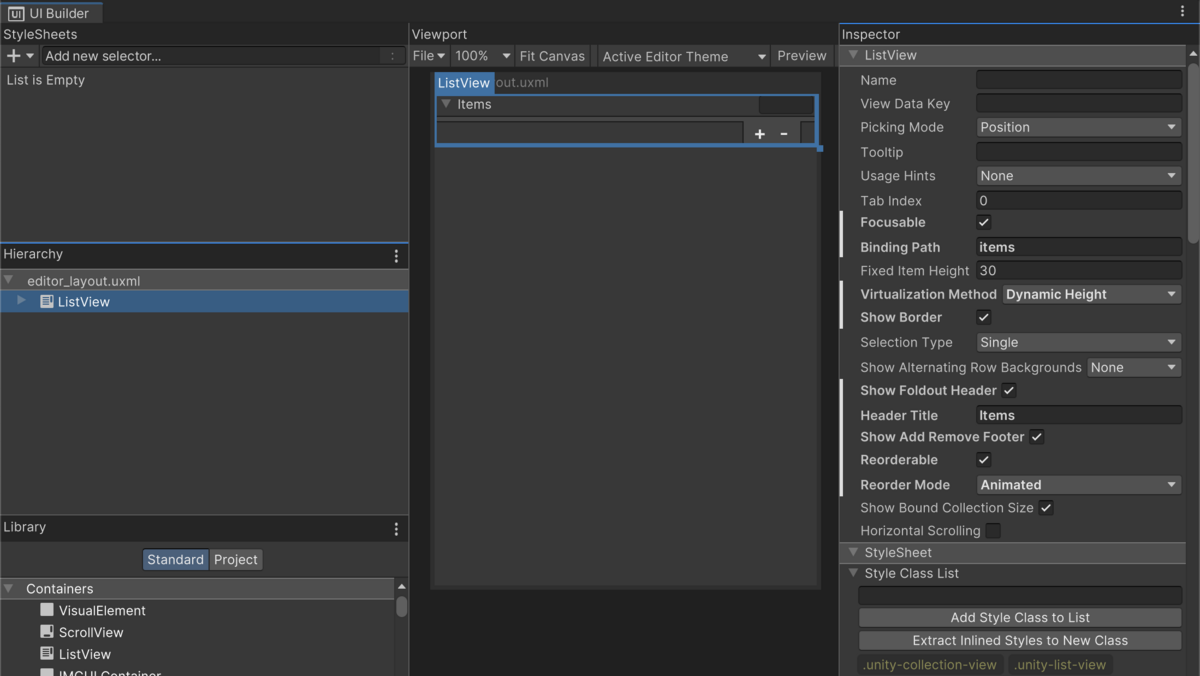
基本的にUI BuilderでListViewを配置するだけですが、ListViewのヘッダー(タイトルと要素数入力フィールド)やフッター(追加・削除ボタン)を表示する設定にしておく必要があります。
UI Builderにおける設定は下図の通りです。
Binding Pathには今回のバインド対象である変数の名前であるitemsを入力しています。
UXMLは以下の通りです。
<ui:UXML xmlns:ui="UnityEngine.UIElements" xmlns:uie="UnityEditor.UIElements" xmlns="UnityEngine.UIElements" ue="UnityEditor.UIElements" editor-extension-mode="False">
    <ui:ListView focusable="true" binding-path="items" header-title="Items" reorder-mode="Animated" reorderable="true" show-border="true" virtualization-method="DynamicHeight" show-add-remove-footer="true" show-foldout-header="true" />
</ui:UXML>
これをeditor_layout.uxmlとして保存しておきます。
ListViewの要素を作る
次にListViewの各要素となるUIのUXMLファイルを作ります。
下図のようにToggleとTextFieldを横一列に並べておきます。

UXMLは以下の通りです。
Binding Pathにはそれぞれのバインド対象の変数名であるenabledとnameを入力しています。
<ui:UXML xmlns:ui="UnityEngine.UIElements" xmlns:uie="UnityEditor.UIElements" xsi="http://www.w3.org/2001/XMLSchema-instance" engine="UnityEngine.UIElements" editor="UnityEditor.UIElements" noNamespaceSchemaLocation="../../UIElementsSchema/UIElements.xsd" editor-extension-mode="False">
    <ui:VisualElement style="flex-direction: row; flex-shrink: 1;">
        <ui:Toggle binding-path="enabled" />
        <ui:TextField picking-mode="Ignore" value="filler text" text="filler text" binding-path="name" style="flex-grow: 1; margin-left: 8px; margin-right: 8px;" />
    </ui:VisualElement>
</ui:UXML>
これをitem_layout.uxmlとして保存しておきます。
CustomEditorを作る
最後にInspector表示用のスクリプトを以下のように作成します。
ListView.makeItemでリスト要素のVisualElementを作っている点がポイントです。
このように要素を作っておけば、あとはあらかじめUXML側に設定したパスを使ってバインドされます。
using UnityEditor;
using UnityEngine;
using UnityEngine.UIElements;

[CustomEditor(typeof(Example))]
public sealed class ExampleEditor : Editor
{
    [SerializeField] private VisualTreeAsset itemLayout;
    [SerializeField] private VisualTreeAsset editorLayout;

    public override VisualElement CreateInspectorGUI()
    {
        var root = editorLayout.CloneTree();
        var listView = root.Q<ListView>();
        listView.makeItem = itemLayout.CloneTree; // listViewのmakeItemでリストの要素のVisualElementを作る        return root;
    }
}
動作確認
Projectウィンドウで先ほどスクリプトを選択し、Inspectorから以下のように設定します。

次にCreate > ExampleからScriptableObjectを作成します。
作成したらそれを選択してInspectorを表示すると、正常に表示されていることが確認できます。
